How Long Does A Typical Residential Artificial Grass Installation Take?
Grace Sloggett • June 15, 2026
The body content of your post goes here. To edit this text, click on it and delete this default text and start typing your own or paste your own from a different source.
The body content of your post goes here. To edit this text, click on it and delete this default text and start typing your own or paste your own from a different source.

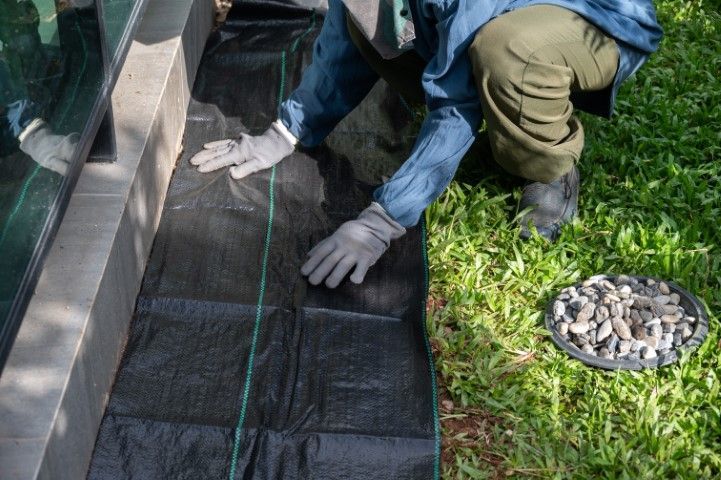
Integrating a professional-grade weed barrier is a fundamental step in ensuring the structural and aesthetic success of a synthetic grass installation . This protective layer serves as a durable shield between the native soil and your new lawn, preventing nature from reclaiming the space. Without this essential barrier, the longevity of your investment is at constant risk from aggressive root systems and soil shifting. A high-quality installation treats this layer as a non-negotiable insurance policy for the future of your outdoor living area. Preventing Invasive Root Penetration Aggressive weeds and native grasses have the remarkable ability to push through even the most compacted sub-bases and drainage holes in turf backing. A high-quality barrier is specifically engineered to block this upward growth, ensuring your lawn remains smooth and puncture-free. Select a heavy-duty geotextile fabric that is rated for high puncture resistance to stop tough weeds like crabgrass. Ensure total coverage of the excavated area to prevent any "leakage" of vegetation at the edges of the project. Focus on overlapping seams significantly to create a continuous wall that roots cannot navigate around. By stopping growth at the source, you eliminate the mechanical damage that roots can cause to the expensive backing of your synthetic turf. Protecting the Integrity of the Sub-Base A major threat to the lifespan of a synthetic lawn is the mixing of native soil with the clean aggregate materials used for the base. The weed barrier acts as a stabilization layer that prevents these two different materials from contaminating each other over time. Lay the fabric directly onto the sub-grade to keep the crushed stone base from sinking into soft underlying mud. Maintain a clear separation that prevents "fines" from the soil from clogging the drainage pores of your aggregate. Use the barrier to provide a consistent tension across the yard, which helps distribute weight more evenly. This separation ensures that the foundation remains rock-solid and level, preventing the dips and valleys that often lead to premature turf replacement. Enhancing Efficient Drainage Performance Quality weed barriers are designed with advanced permeability that allows water to flow vertically into the water table without restriction. This prevents the accumulation of moisture at the base of the turf, which can lead to mold, mildew, and the breakdown of adhesives. Choose needle-punched fabrics over solid plastic sheets to ensure that every square inch of the lawn breathes. Verify that the flow rate of the fabric matches or exceeds the drainage capacity of the turf itself. Prevent the buildup of stagnant water that can attract pests or create foul odors within the thatch layer. Maintaining a dry, well-ventilated system is key to preserving the chemical and structural bonds of the synthetic grass fibers. Mitigating UV Damage and Thermal Stress While it is hidden beneath the surface, a weed barrier contributes to the overall thermal stability of the installation. It provides an additional layer of insulation that protects the primary backing of the turf from the harsh temperature fluctuations of the soil. Select UV-stabilized fabrics that will not become brittle or decompose if exposed to sunlight during the installation process. Use the barrier to help dissipate heat absorbed by the turf, protecting the sub-base from extreme thermal expansion. Ensure the material is thick enough to provide a physical buffer against the friction caused by the expansion of the ground. By regulating the environment beneath the grass, the barrier helps the turf maintain its shape and flexibility for many more seasons. Reducing Long-Term Maintenance Labor The ultimate goal of switching to synthetic grass is to enjoy a low-maintenance lifestyle, and a weed barrier is the primary tool that makes this possible. It virtually eliminates the need for chemical herbicides or manual weeding, which can inadvertently damage the synthetic fibers over time. Block sunlight from reaching the soil to prevent the germination of dormant seeds that have been buried for years. Create a sterile environment that is less attractive to burrowing insects and small garden pests. Protect the infill material from being contaminated by organic soil, which can eventually lead to surface-level weed growth. A proactive approach to weed prevention saves hundreds of hours in labor and ensures the lawn looks pristine with minimal effort. Securing the Future of Your Outdoor Sanctuary Choosing a high-quality weed barrier is the most cost-effective way to guarantee that your synthetic lawn remains a beautiful and functional asset. This invisible layer is the silent guardian of your property, working 24/7 to maintain the perfection of your landscape. When you invest in the best foundational materials, you are choosing a landscape that will stand the test of time and weather. Enjoy the peace of mind that comes with a professionally protected lawn that looks spectacular for decades to come.
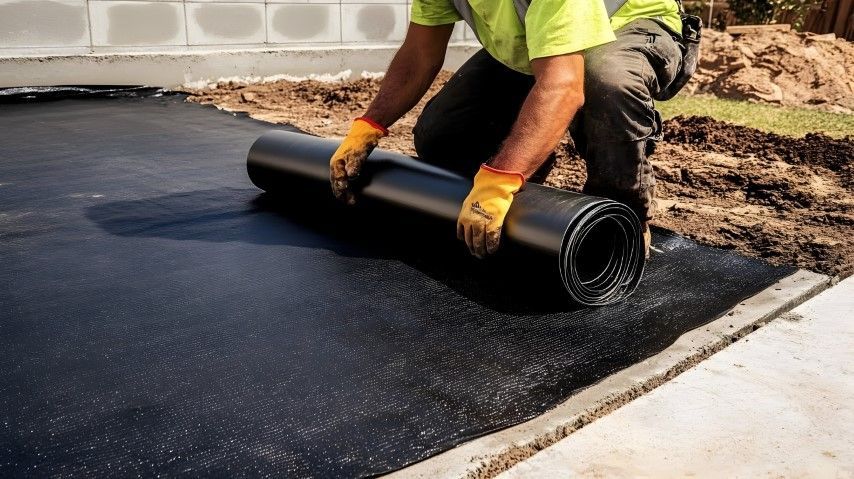
A high-quality weed barrier is a vital component of any professional landscaping project, serving as the primary defense against invasive roots and soil contamination. However, the most common concern for property owners is ensuring that this protective layer does not act as a dam, trapping water and causing surface pooling. Balancing the need for a sterile environment with the necessity of rapid water runoff is the key to a successful renovation. When executed with the right materials and techniques, a weed barrier enhances the lifespan of your lawn without ever hindering the flow of moisture into the subsoil. Selecting High-Permeability Geotextile Fabrics Not all landscape fabrics are created equal, and choosing a material with a high flow rate is the first step in protecting your drainage system. Professional-grade non-woven geotextiles are engineered with thousands of tiny pores that allow water to pass through while blocking the passage of sunlight and seeds. Opt for a needle-punched fabric that offers a high "gallons-per-minute" rating to handle heavy downpours. Avoid plastic-based or solid sheet barriers that are completely non-porous and lead to immediate standing water. Select a weight that is heavy enough to suppress weeds but light enough to maintain a high level of breathability. The right fabric choice ensures that your barrier acts as a filter rather than a solid lid, keeping the system flowing freely. Integrating the Barrier Within the Sub-Base The placement of the weed barrier within the layers of your landscape foundation significantly impacts how water moves through the site. Many experts recommend placing the fabric between the native soil and the aggregate base to prevent fine dirt from clogging the stones above. Clear the area of all sharp debris that could puncture the fabric and create a bypass for both weeds and silt. Lay the fabric directly onto the excavated soil before adding your crushed stone or decomposed granite layers. Ensure the fabric is pulled taut to avoid folds or "cups" where water could collect and stagnate. Strategic placement prevents "soil migration," which is the primary cause of drainage failure in older landscaping projects. Executing Proper Overlap and Seam Management When installing multiple rolls of weed barrier , the way the sections are joined can either facilitate or frustrate proper water movement. Overlapping the edges ensures total coverage, but these seams must be handled carefully to avoid creating thick, impermeable ridges. Overlap all edges by at least six inches to ensure that no gaps open up during the compaction process. Use landscape staples to secure the seams tightly, preventing the fabric from shifting and bunching under the weight of the base material. Directional overlapping—placing the higher-side fabric over the lower-side—helps water glide over the seam and into the soil. Properly managed seams create a continuous, protective skin that maintains a uniform drainage rate across the entire yard. Maintaining Consistency in the Aggregate Layer The materials placed on top of the weed barrier play a supporting role in keeping the fabric's pores open and functional. Using a clean, angular stone allows water to reach the barrier quickly and creates a "bridge" that prevents the fabric from being crushed into the mud. Ensure the base material is free of excessive "fines" or dust that could wash down and plug the fabric pores. Apply the first layer of stone carefully to avoid tearing the fabric with heavy machinery or tools. Monitor the compaction levels to ensure the base is solid but still porous enough to allow vertical water travel. A well-structured aggregate layer protects the integrity of the barrier while providing the necessary paths for water to escape. Perimeter Tucking and Edge Drainage The edges of your lawn are often where water accumulates most, making the perimeter installation of the weed barrier a critical detail. Ensuring the fabric extends all the way to the border prevents weeds from creeping in at the seams while allowing water to exit toward the yard’s natural drainage points. Tuck the barrier into a trench at the edge of the installation to prevent it from "wicking" moisture back toward the surface. Ensure the fabric doesn't block the exit points of any French drains or perforated pipes integrated into the landscape. Trim the fabric flush with the header board or mow strip for a clean finish that doesn't trap debris. Precision at the edges guarantees that your drainage system remains a closed loop, protecting your property from the outside in. Securing a Dry and Weed-Free Landscape Future Achieving a pristine, low-maintenance lawn does not require a trade-off between weed protection and effective water management. By following professional installation standards, you can enjoy a landscape that remains bone-dry and structurally sound regardless of the weather. The invisible work performed during the fabric installation is what ultimately defines the success of your outdoor renovation. A correctly installed weed barrier is a silent partner in your home's longevity, providing a stable foundation for years of worry-free enjoyment.
The body content of your post goes here. To edit this text, click on it and delete this default text and start typing your own or paste your own from a different source.
The body content of your post goes here. To edit this text, click on it and delete this default text and start typing your own or paste your own from a different source.
A high-quality weed barrier serves as the invisible defender of your landscape, preventing unwanted growth from disrupting your lawn's aesthetic. During a renovation, evaluating the condition of this layer is vital because a compromised barrier can lead to costly maintenance issues down the road. Investing time in the foundation of your project ensures that your new grass or gravel remains undisturbed by aggressive root systems. Addressing the barrier now prevents the frustration of seeing weeds penetrate through your brand-new surface just months after completion. Identifying Visible Decay and Material Breakdown Over time, even the most durable landscape fabrics begin to fray, thin, or decompose due to soil acidity and microbial activity. If you pull back your current surface and see holes or thinning fibers, the material has reached the end of its functional life. Look for "skeletal" patterns where only the strongest fibers remain, leaving gaps for seeds to take root. Check for brittle sections that crumble or tear easily when handled during the excavation process. Inspect the edges for significant fraying that indicates the weave is no longer tight enough to block light. Replacing a decaying fabric at this stage is a mechanical necessity to keep the soil beneath separated from your top layer. Managing Persistent Invasive Root Penetration When aggressive weeds or grasses have already punched through the existing fabric, the barrier is effectively bypassed and no longer serves its purpose. Once a root system establishes itself through the weave, it creates a permanent highway for future growth that is nearly impossible to stop. Assess if common invasive species have woven their roots directly into the fabric mesh. Determine if removing the weeds leaves behind large punctures that compromise the barrier's integrity. Clear out any "volunteers" that have grown from underneath rather than from wind-blown seeds on top. If the old barrier has been breached, laying a new, puncture-resistant layer is the only way to reset the clock on weed prevention. Correcting Poor Drainage and Silt Buildup A weed barrier that has become "blinded" by silt and fine soil particles will no longer allow water to pass through to the subsoil. This leads to standing water and surface rot, which can destroy the look and health of your new lawn renovation. Test the permeability by pouring water on the old fabric to see if it pools or drains immediately. Remove layers of "biofilm" or sludge that have accumulated on the surface of the fabric over the years. Ensure that the barrier isn't trapping moisture against the base of your installation, which can lead to mold. Fresh fabric ensures that your drainage system works as intended, keeping the entire landscape dry and stable. Upgrading During Major Grading or Excavation If your renovation involves changing the slope of your yard or digging out several inches of soil, the old barrier will likely be disturbed. It is far more efficient to install a modern, professional-grade barrier while the site is already cleared and the soil is exposed. Take advantage of the open ground to lay wider, seamless sheets that offer better coverage than old, patched sections. Upgrade to a higher-weight fabric that provides better stabilization for modern synthetic turf or heavy decorative stone. Overlap new sections by at least six inches to prevent gaps during soil settling or heavy foot traffic. Starting fresh during the grading phase guarantees that the barrier is perfectly contoured to the new shape of your land. Addressing Contamination from Organic Debris Years of decomposing leaves, mulch, and dust can create a layer of "new soil" right on top of your old weed barrier. This organic buildup provides a perfect growing medium for weeds, rendering the barrier underneath completely irrelevant to the surface. Scrape away the layer of accumulated silt to see if the fabric is buried under more than an inch of debris. Evaluate if the old fabric is trapped in a "sandwich" of organic matter that will continue to sprout weeds. Clear the site down to the native soil to ensure the new barrier sits directly on a clean, sterile foundation. Removing the old, contaminated layer ensures that your new installation starts with a completely clean slate. Ensuring the Longevity of Your Landscaping Investment Choosing to replace a questionable weed barrier today is a strategic move that protects the value and beauty of your property for the future. The relatively small cost of new fabric is a minor detail compared to the long-term labor involved in fighting recurring weed infestations. A professional-grade foundation is the only way to achieve the true low-maintenance lifestyle that a lawn renovation promises. By installing a fresh, high-performance barrier now, you are securing a pristine outdoor space that stays beautiful with minimal effort.
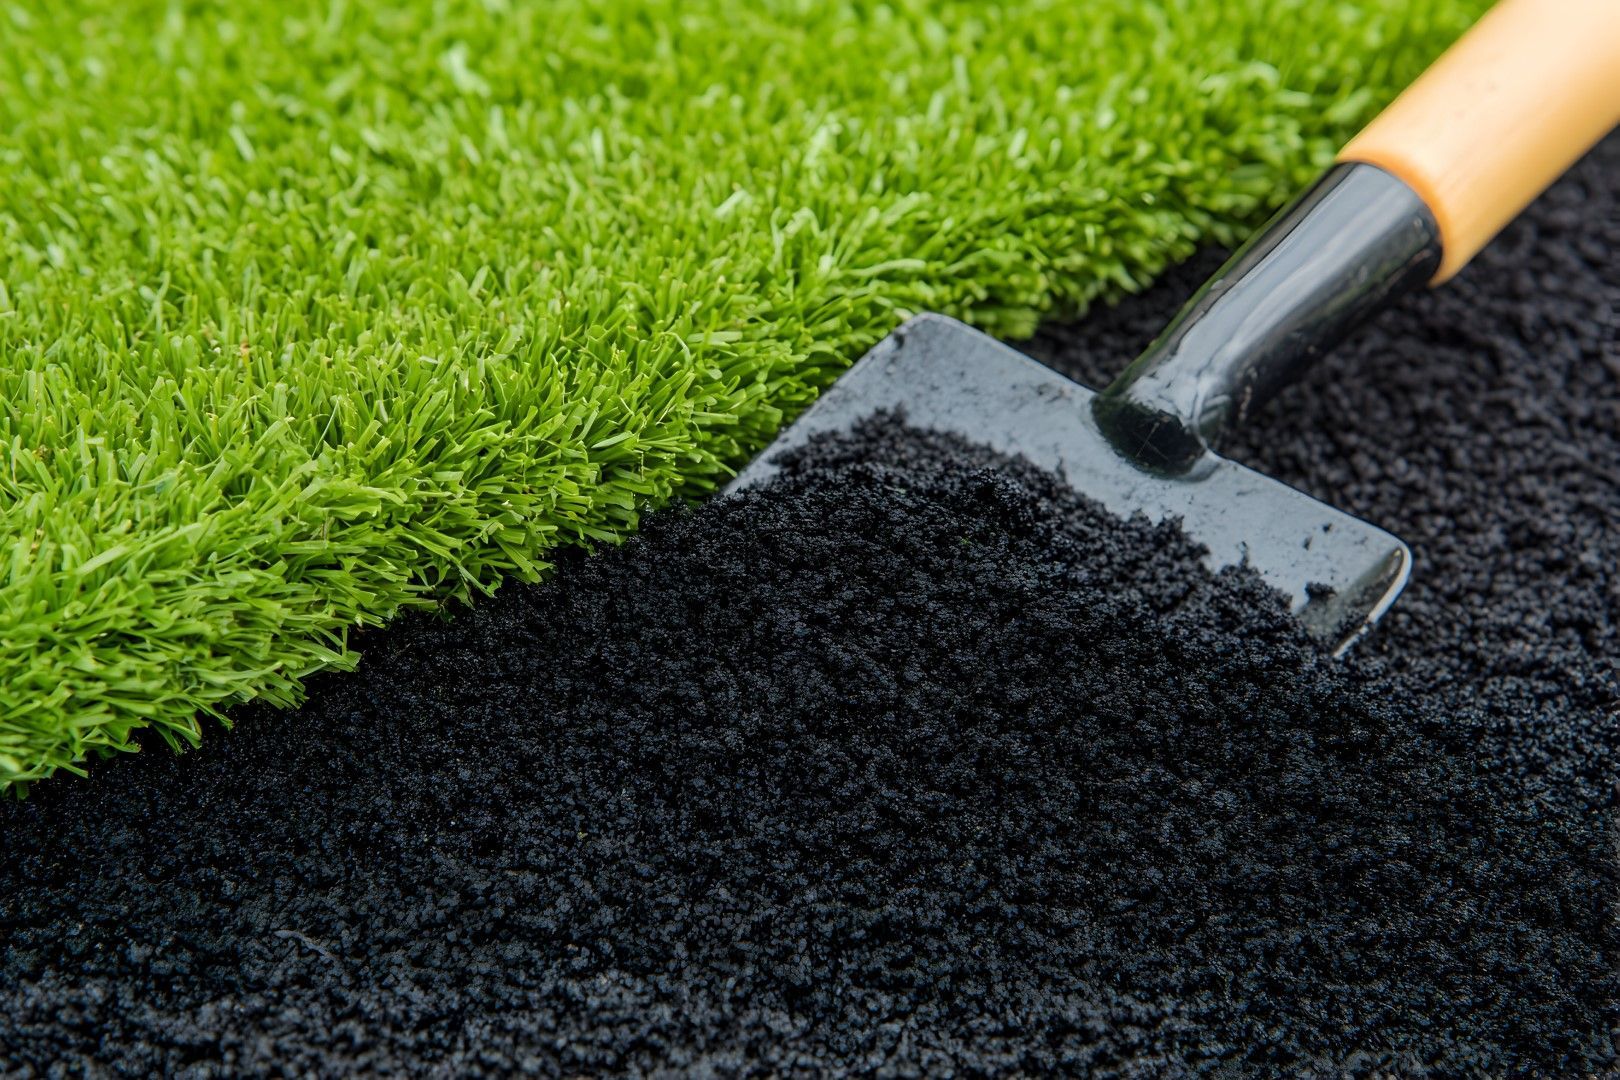
Infill is a granular material spread between the blades of synthetic grass during the final stages of a professional installation. While often invisible to the eye, this component serves as the structural backbone that allows a lawn to function like natural sod. Without the proper application of infill , a synthetic lawn is essentially just a carpet pinned to the ground. Integrating this layer is what transforms a simple aesthetic upgrade into a durable, high-performing outdoor surface that can handle years of activity. Maintaining Upright Blade Structure Synthetic grass blades naturally want to lay flat after being manufactured and rolled up for shipping. Infill acts as a supportive cushion at the base of each fiber, forcing the blades to stand vertically for a more realistic appearance. Choose a grain size that matches the density of your turf to provide maximum support without clumping. Apply the material evenly to prevent some areas from looking "matted" while others remain upright. Brushing the turf after application helps the granules settle deep into the thatch layer for consistent lift. This structural support ensures your lawn looks lush and freshly manicured even after people or pets walk across the surface. Providing Essential Ballast and Stability The sheer weight of the infill provides the necessary ballast to keep the turf securely anchored to the sub-base. This heavy layer prevents the fabric from shifting, rippling, or expanding and contracting during extreme temperature changes. Use a high-quality silica sand or coated granulate to add significant weight across the entire square footage. Focus on heavy-traffic areas where the risk of the turf "creeping" or moving is highest. Ensure the infill is distributed all the way to the edges to prevent the perimeter from lifting. By weighing down the system from the top, infill keeps the installation tight and flat, regardless of the weather. Protecting the Primary Backing The primary backing of synthetic turf is the fabric into which the grass fibers are tufted, and it is vulnerable to damage from ultraviolet rays. Infill covers this backing completely, acting as a protective shield against the sun and physical abrasion. Select a UV-resistant infill to help dissipate heat and prevent the backing from becoming brittle over time. Maintain the correct infill depth to ensure that no part of the black backing material is exposed to direct sunlight. The layer also prevents shoe soles or pet claws from coming into direct contact with the structural mesh. This protective barrier effectively doubles the lifespan of the turf by preserving the integrity of its foundation. Enhancing Drainage and Cooling Modern infill options are designed to facilitate the rapid movement of water through the turf system and into the base below. Some specialized materials also have the ability to retain moisture and release it slowly to keep the surface cool. Opt for rounded granules that won't clog the drainage holes in the turf backing. Consider antimicrobial coatings if the lawn will be used frequently by pets to manage odors and moisture. Evaporative cooling infills can significantly reduce surface temperatures during the peak of a hot summer day. Effective moisture management keeps the lawn sanitary and comfortable for bare feet even in the height of July. Impact Absorption and Foot Traction Walking on a synthetic lawn should feel springy and secure, much like walking on well-maintained natural grass. Infill provides a layer of shock absorption that protects joints and offers the traction necessary for running and playing. Adjust the infill volume to achieve the desired level of firmness or softness underfoot. Rounded infill particles provide a smoother feel and reduce the risk of skin "turf burn" during falls. Consistent infill levels prevent slippery spots and ensure a predictable surface for sports and games. A well-filled lawn offers a safer environment for children and athletes by providing a stable and cushioned landing zone. Maximizing Your Investment Through Proper Infill Neglecting the infill phase is one of the most significant mistakes a property owner can make when switching to synthetic grass. It is the silent workhorse that ensures your landscape remains resilient, attractive, and functional throughout its entire lifecycle. By selecting the right material and maintaining the proper levels, you guarantee that your lawn will stand the test of time. A fully integrated infill system is the final step in creating a world-class outdoor space that looks as good as it performs.
Avoid costly DIY mistakes. Learn why hiring a certified contractor ensures proper drainage, seamless edges, and a professional warranty you can trust.
Discover the expert 5-step process for a perfect lawn, from site prep and base grading to precision seaming and infill for a durable, high-quality finish.